Shoulder pain, ugh, right? It can be such a buzzkill! Whether you’ve been working out too hard or just slept in a weird position, it’s like a persistent little ghost just hanging around.
Este blog ofrece contenido únicamente con fines informativos, educativos y de reflexión. La información publicada no constituye consejo médico, psicológico ni psiquiátrico, y no sustituye la evaluación, el diagnóstico, el tratamiento ni la orientación individual de un profesional debidamente acreditado. Si crees que puedes estar atravesando un problema psicológico o de salud, consulta cuanto antes con un profesional certificado antes de tomar cualquier decisión importante sobre tu bienestar. No te automediques ni inicies, suspendas o modifiques medicamentos, terapias o tratamientos por tu cuenta. Aunque intentamos que la información sea útil y precisa, no garantizamos que esté completa, actualizada o que sea adecuada. El uso de este contenido es bajo tu propia responsabilidad y su lectura no crea una relación profesional, clínica ni terapéutica con el autor o con este sitio web.
You’ve probably heard about KT tape. That colorful stuff athletes use? Yeah, it’s not just for show. It can actually help ease that nagging shoulder pain and give you some relief.
So, if you’re curious about how to make this tape work for you, keep reading! You might find your new best friend in sports medicine right here.
Identifying Rotator Cuff Tear: Two Key Warning Signs to Watch For
When you think about shoulder pain, it can be pretty frustrating. You might be wondering if you’ve got a rotator cuff tear. This condition is common among athletes but can affect anyone, really. So how do you figure it out? Let’s chat about two key warning signs to watch for.
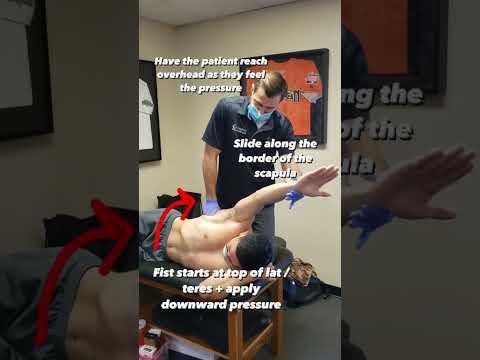
1. Weakness in Arm Strength
One of the first signs that something might not be right is weakness in your arm. Picture this: you’re at the gym and trying to lift a weight overhead that you normally handle with ease, but suddenly, it feels like there’s a rubber band on your shoulder holding you back. You know what I mean?
That weakness often happens because the rotator cuff muscles help stabilize your shoulder joint. When they’re torn, your arm just doesn’t have the support it needs.
2. Pain During Movement
The second big warning sign is pain during movement—especially when lifting your arm or reaching behind your back. Maybe you’re playing catch with friends and every time you throw, there’s a painful twinge in your shoulder that makes you wince. Ouch!
This pain usually means that the rotator cuff isn’t doing its job properly anymore because of the tear. You might also notice that certain positions make the pain worse, like if you’re reaching up high or trying to scratch an itch on your back.
- Feeling weak when lifting objects.
- A sharp or dull pain during specific movements.
If any of these signs are ringing true for you, it’s important to consult with a healthcare professional for proper diagnosis and treatment options because self-diagnosing can lead to more problems down the line.
And hey, if you’re looking into relieving some of that shoulder pain while waiting for professional help, KT tape can be beneficial! It’s like giving your shoulder a little extra boost of support without immobilizing it completely.
In cases like this, remember: listening to your body is key! If something feels off, don’t brush it aside; get some help so you can get back to doing what you love—pain-free!
Optimal Duration for KT Tape Application on Your Shoulder: A Comprehensive Guide
KT tape, or kinesiology tape, has become super popular among athletes and anyone dealing with shoulder pain. It’s that colorful, stretchy tape you often see on players during games. But how long should you actually keep it on for optimal results? Let’s break it down!
General Duration
Typically, KT tape can be applied for about 3 to 5 days, depending on your activity level and skin sensitivity. You know how when you put on a fresh shirt, it feels great? Well, that’s kind of how KT tape works! Freshly applied tape is usually most effective. After a few days, it may start to lose its stickiness or effectiveness.
Factors Influencing Duration
There are several factors that can influence how long you might want to keep the tape on:
- Activity Level: If you’re an athlete who’s really moving around a lot, sweat and friction can make the tape peel off quicker.
- Skin Type: Some folks have more sensitive skin than others. If irritation starts to show up, it’s better to take the tape off.
- Tape Quality: Not all kinesiology tapes are made equal! High-quality brands will generally stick better and last longer.
Anecdote Time!
I remember my buddy Dan was training for a triathlon. He had this nagging shoulder pain. Friends suggested using KT tape after watching some pros do it during races. At first, he kept it on for too long—like way longer than five days—and ended up with some irritation! So hey, less isn’t always more with this stuff; if your skin starts itching or peeling back at you? Time to swap out the tape!
The Application Process
Now that you’re aware of the duration let’s tackle how to apply KT tape effectively:
- Clean Skin: Make sure your skin is clean and dry before applying; even a little sweat can mess with adhesion.
- Mold It Right: Place the muscle in a stretched position while applying the tape to give support where it’s needed most.
- Smooth It Down: Rub over the tape gently after application—this activates the adhesive better!
When To Take It Off?
If you notice any of these signs, it’s probably time for a change:
- Irritation or Redness: Your skin shouldn’t feel like it’s fighting back!
- Peeled Edges: If parts of the tape start lifting away from your skin—goodbye!
- No More Support: When it feels loose or not sticking well anymore—it’s better safe than sorry.
There you have it! Using KT Tape effectively can be super helpful for managing shoulder pain but always remember this tip: **it doesn’t replace professional medical help**. If you’re dealing with constant shoulder issues or injuries, checking in with a healthcare provider is key.
So now that you’ve got some insight into timing and application—feel ready to give it go?
Exploring the Effectiveness of Taping for Shoulder Bursitis Relief
Shoulder bursitis can be a real pain, literally. If you’ve ever felt that nagging ache in your shoulder, you know how disruptive it can be. You might have heard about taping techniques like kinesiology tape (KT tape) being used for relief. So, what’s the deal with that? Let’s break it down.
Taping for shoulder bursitis aims to reduce pain and inflammation and improve mobility. Many people have found it helpful, but **it’s not a one-size-fits-all solution**. Taping doesn’t replace medical advice or treatment, just to be clear.
First off, when you’re dealing with shoulder bursitis, the goal is to alleviate pressure on the bursa—those little fluid-filled sacs that help your joints move smoothly. Tight muscles or misalignment can cause irritation there, and this is where KT tape may step in.
Here are some key points about using KT tape:
- Support: The tape provides gentle support without restricting movement completely. It’s like having a buddy watching your back while you tackle those everyday tasks.
- Pain reduction: Some users report that taping helps ease discomfort by reducing pressure on the inflamed area.
- Improved circulation: Taping might help enhance blood flow to the area, which could promote healing—like giving your shoulder a little pep talk.
- Proprioception: This fancy term just means your body’s awareness of where it is in space. The tape can give feedback to your brain about movements, helping you avoid awkward positions that might worsen your shoulder.
Now let’s look at how someone might apply KT tape for their shoulder bursitis. Picture this: you’re getting ready for a game of pick-up basketball but feel that familiar twinge in your shoulder from last week’s workout.
You grab some KT tape and decide to give it a try before hitting the court. You start by cleaning your skin (no lotion!), then measure out strips of tape to cover around the affected area without pulling too tightly—just enough tension for support but not cutting off circulation.
You attach one end of the strip right on the sore spot and lay down the rest along your muscle channels, slightly stretching as you go—but again, not too much! A little “U” shape at both ends gives extra focus where needed.
A few things to remember:
- The effectiveness varies: Some people swear by taping; others might not notice much difference.
- Taping alone won’t fix everything; combine it with other treatments like physical therapy or icing.
- If you feel any discomfort while using the tape or if symptoms worsen, take it off and consult with a healthcare professional.
In short? KT taping for shoulder bursitis could provide some relief and support during activities—but don’t lean solely on it as a cure-all solution! Take care of yourself and keep communication open with any healthcare providers you see if discomfort continues or worsens.
Feeling like you’ve got a better handle on this now? Sometimes just understanding what you’re dealing with can be half the battle!
You know, dealing with shoulder pain can be such a bummer. I remember this one time, I was trying to impress my friends on the basketball court. I went for a layup and—bam!—a sharp pain shot through my shoulder. Ouch! There I was, sidelined and grumpy while everyone else played. Anyway, that’s when I stumbled upon KT tape.
So, what’s this KT tape all about? It’s basically this stretchy tape that’s kind of like a hug for your muscles and joints. It helps support your shoulder without restricting movement too much. The cool thing is that it can promote circulation and reduce swelling, which is something we all want when we’re nursing an injury like mine.
Applying the tape isn’t rocket science; it just takes a little practice. First off, you want to clean the area where you’re applying it—like really clean, you know? Then you cut pieces of the tape into different lengths depending on where the pain is. You might need one piece running from your collarbone down across your shoulder, then another going from the back towards the front.
Now here’s a little tip: always round off the edges of the tape before sticking it on your skin. It helps avoid those annoying peeling corners later on—you don’t want to deal with that while trying to recover!
Also, don’t stretch it too much when applying; that can actually make things worse instead of better. Just look for that sweet spot of enough tension to support but not so much that you feel like you’re in a straight jacket.
Remember how I said KT tape helps with circulation? That’s where it gets really interesting! By lifting the skin slightly, it creates space for fluid to move around more easily. This means less pain and more mobility—perfect for getting back on that basketball court!
But hey, here’s the catch: while KT tape can help ease discomfort and provide support during recovery, it’s not some magic cure-all potion. If your shoulder pain hangs around longer than expected or gets worse, definitely talk to a healthcare professional about it.
In short, if you’re dealing with shoulder aches or just trying to keep active after an injury like me back in the day, give KT tape a shot! Just make sure you use it right so you can get back in action sooner rather than later. And who knows? You might find yourself dunking those layups again in no time!